The Peter Lynn ARC set-up FAQ
Disclaimer: Please note the following information is to be used at your own risk. The Author will NOT be held liable for any errors or damage that may or may not happen when following any of the instruction below.
The following is not part of any Peter Lynn Kite manual, nor is
it designed to replace the manufactures User Manuals.
The author of this web page has no connection to Peter Lynn Kiteboarding.
Peter Lynn have altered their bar setups over the years, so there is no single standard setup for all their kites.
Many ARCusers don't use PLK control bars with their kite.
This FAQ is designed to give every ARCuser information and help in setting up their kites.
Before making any adjustments try and fly the kite as supplied
using all the 'Default' - as supplied settings.
and READ the Peter Lynn - Users Manual.
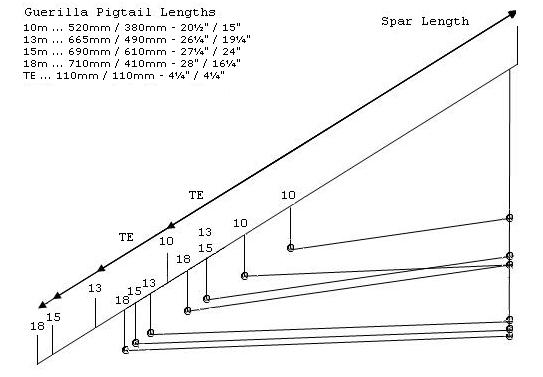
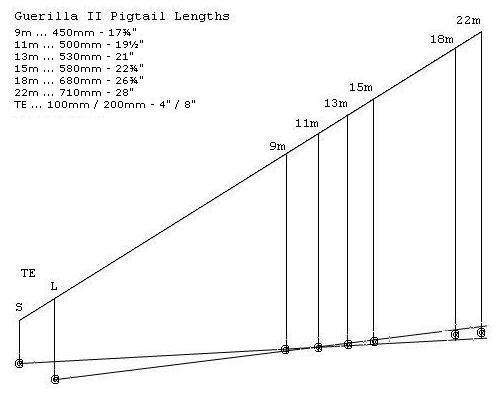
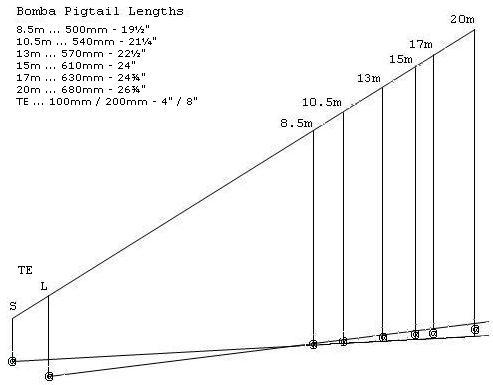
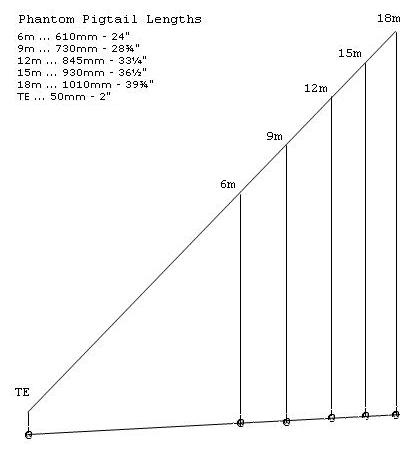
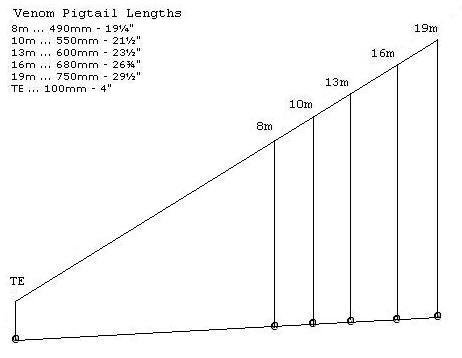
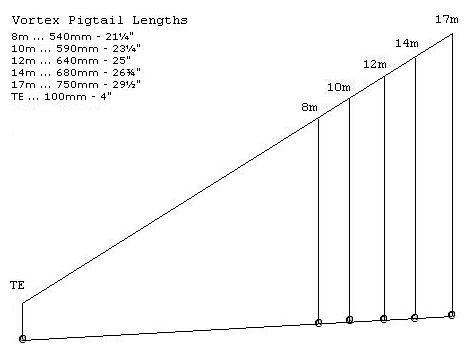
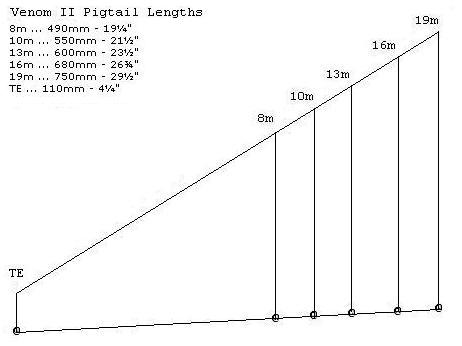
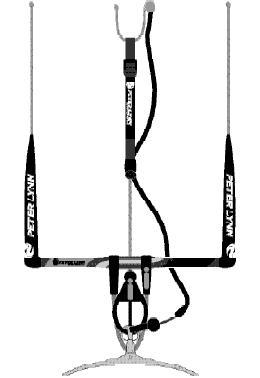
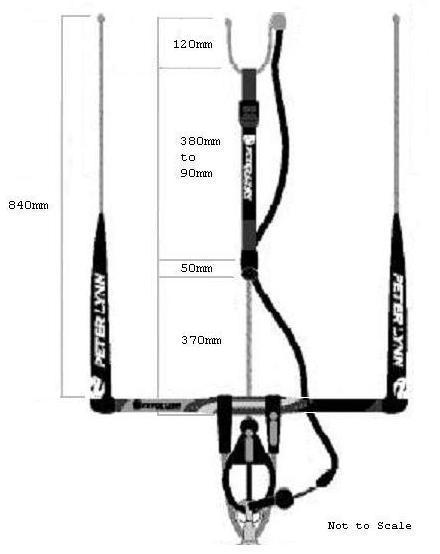
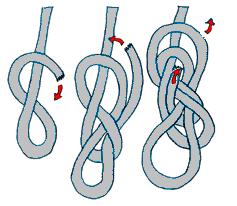
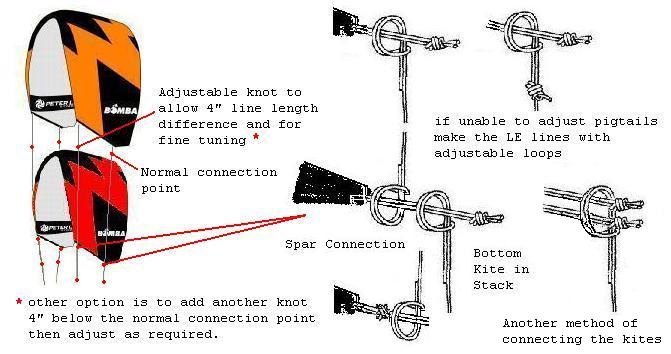
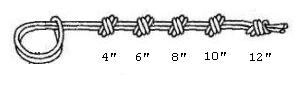
Kite Pigtail Length Guide
PL kite Pigtails are made from 500Kg - 700Kg Spectra line.
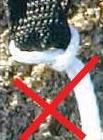
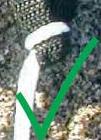
Pigtails should be attached with a Lark-head knot to the spar connectors as shown.
If you need to add extra or a new pigtail knot use a overhand or figure 8 knot.
Tip: It is better to use a figure 8 knot if you want to adjust its position or remove it at a later date.
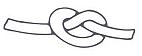 Overhand knot
 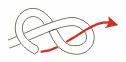 Figure 8 knot
Kite |---------------------New Knot--@-----------@ Original end/default knot
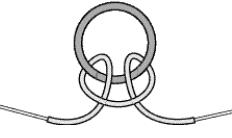
How to attach your flying lines...
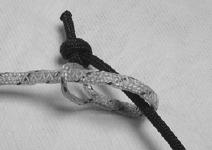 Larkshead Knot
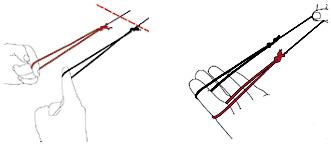
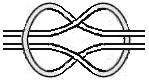
When connecting the lines one of the tips needs the lines to be crossed as in the diagram below.
One of the front lines MUST pass OVER the back line for the same wing tip.
The DOWNWIND tip MUST NOT have any of the lines crossed.
ALL attached larkshead knots MUST be pulled tight before launching.
If when first setting up your kite it refuses to launch, or just sits at 6ft to 10ft off the ground, first make a note the wind speed. In very light winds the kites with an internal adjustable strap may have this adjusted to tight. For less than 8 knots of wind it is best to have rear strap set to fully loose position.
If everything looks normal you may need to check you setup further as the problem could be one of many things such as line lengths, connected to the wrong pigtail knots etc.
What to check for if the kite launches but then back stalls without pulling in on the bar.
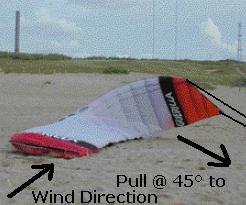
1 - There may not be enough wind to fly. This can be found with Guerilla II's these kites have a fixed leech line in the kite which is set to the kites optimum setting. If the wind is below what the kite is designed to fly in the kite sits at 45°
2 - The back lines (steering) may be too tight which stalls the kite. Kite should sit directly over head when at the zenith and with the bar fully out. Rear lines should be slack.
3 - The back lines (steering) may be too loose - this gives little or no steering when flying the kite fully powered.
4 - The front pigtails are to long
Check the position of the Depower trim adjuster.
Pulled fully in, should be full depower - in light winds the rear lines will be loose.
On the later Zero4 and Zero7 bars it may be possible to adjust out any pigtail setup error, but this then limits the amount of further adjustment.
On other bars 03 or non PL control bars it is often impossible, as the amount of depower is greatly reduced as to limit the usable wind range.
If your kite still has problems you then need to check Pigtail, line lengths and actual bar settings.
Yes, it is possible to adjust at the leader lines to compensate for the differences but this doesn't always work if you use the bar with different kites. Its always recommended to adjust at the kite end, also a safety issue as any loose/long lines can get caught when you
release to the safety Leash in an emergency and prevent the kite from depowering.
To correct the problem, new knots or extensions may need to be added to the kites pigtails.
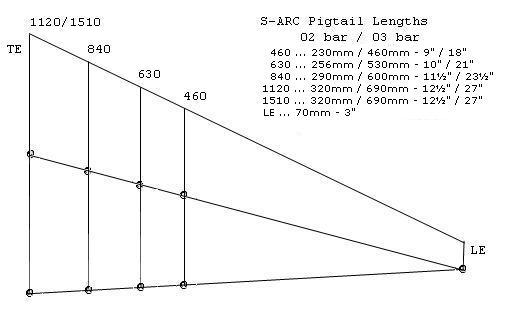
Graphics for Kite Pigtail Settings Required for 03 Control Bars
Note: The angles from the Front to Rear Pigtails are based on the Original Guerilla Kite Setup using the PL03 control bar.
Angle from Rear Outer Pigtail to front lower knot = 3°
Angle from Rear Inner Pigtail to front upper knot = 7°
2002
2003
2004
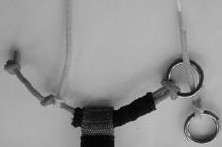
Red & Black Rear Pigtail - Safety Warning
If your kite has these pigtails fitted, extra knots should be added just above the knots you use as it was reported that some existing lines could slide over the knot and detach from the kite. This modification should be added to ALL the pigtails.
This modification is NOT required if your kite only has White pigtails.
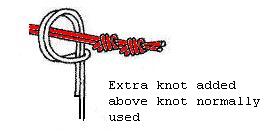 diagram of the required Pigtail modification.
2005
2006
2007
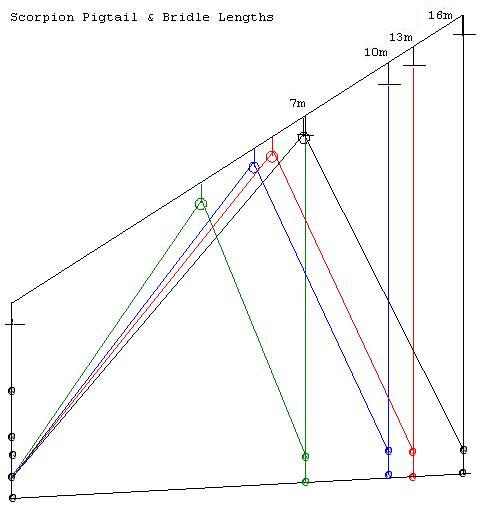
Scorpion - dimensions to be added when available.
In over 10 months I have just 2 sets of data from a 16m and 1 set of data from a 13m - NONE from the 7m and 10m so I can check my rough calculations, Information would have been available much earlier except for the fact everyone I have asked with or access to a 7m and 10m kite has refused to help.
Please see above diagram for the required measurements needed for this FAQ web page.
These include:
From Spar Connector - Total length of the Front Pigtail (To the bottom knot position)
From Front Pigtail - The total length of the V bridle which passes through the pulley to the rear pigtail.
From Spar Connector - Total length of the Rear Pigtail & each knot position to the bottom knot position.
Accurate measurements are needed - It's About, sizes are no good.
2008

Synergy information is under construction.
Dimensions required -
From Spar Connection - Total length of the Front Pigtail (To the bottom knot position)
From Front Pigtail - The total length of the V bridle which passes through the pulley to the rear pigtail.
From Spar Connector - Total length of the Rear Pigtail & each knot position to the bottom knot position.
Accurate measurements are needed - It's About, sizes are no good.
2009

Charger information is under construction.
Dimensions required -
From Spar Connection - Total length of the Front Pigtail (To the bottom knot position)
From Front Pigtail - The total length of the V bridle which passes through the pulley to the rear pigtail.
From Spar Connector - Total length of the Rear Pigtail & each knot position to the bottom knot position.
Accurate measurements are needed - It's About, sizes are no good.
Above settings should also work well with the Zero4/5 bars, which have more adjustment.
This means that the measurements can be adjusted anything up to 100mm for fine tuning.
As is explained below the Pigtail knot positions shown above, are for PL Control Bars - Use
of any other type of control bar and these figures may need further adjustments.
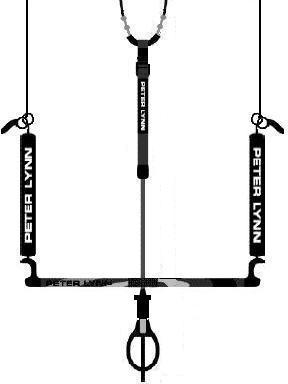
Control Bars - 02 - as supplied with the original S-ARC's
Trim Adjuster Strap = 7" adjustment
Leaders = 56" from bar connections (safety leash leader = 325")
Bar movement = 0mm
Depower Line total length = 43" (LE connections to Bar)
Note - above dimensions work with the following kite pigtails ~ Arc 1120 = Front 3". Back 15".
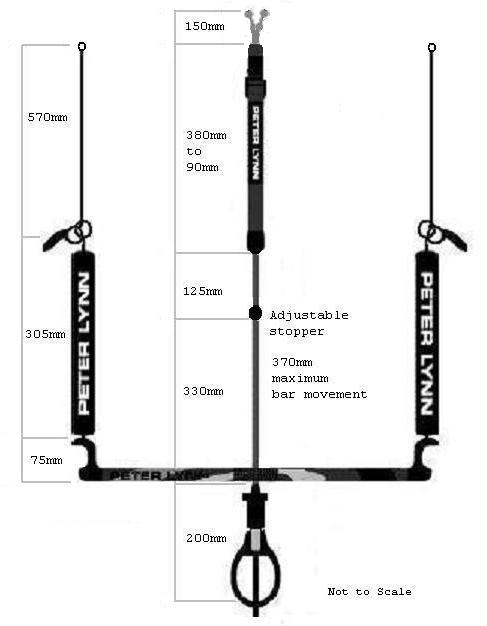
Control Bars - 03 - as supplied with the original Guerilla's
Trim Adjuster Strap = 200mm adjustment
Leaders = 650mm from the bar connection to the end knot
Bar movement = 370mm
Depower Line total length = 780mm (LE connections to Bottom Chicken Loop Stop)
LE leaders = 35mm LONGER than TE
When using a Standard 03 bar on the later kites GII, B, P, V's etc. there is less depower adjustment available than with a Standard 04/Zero4 bar.
The difference between the trim adjuster on each bar has a large effect on the usable wind range of the kite.
The GII-9m when set up with an 03 bar and pigtails as indicated above will work fine in plus 20mph winds but to make it more usable in lower wind (<20mph) an extra knot needs to be added 25-30mm further away from the spar connection.
This give the kite more AoA when fully trimmed out so it is able to catch more of the wind, but not enough that the kite stalls.
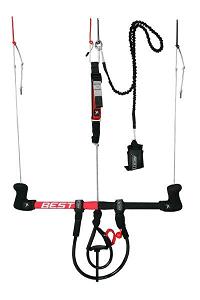
Control Bars - 04 - as supplied with the Guerilla II's & Bomba's
Trim Adjuster Strap = 260mm adjustment
Leaders = 650mm from bar connections to the end knot
Bar movement = 370mm
Depower Line total length (Extended) = 850mm (LE connections to Bottom Chicken Loop Stop)
Depower Line total length (Full depower) = 600mm (LE connections to Bottom Chicken Loop Stop)
LE leaders = ??mm LONGER than TE
When using a 04 bar with the GII, B, P, V's it is possible that the pigtail lengths listed above maybe 100mm to long. This
being the case you will need to either :
- Shorten the pigtails further by another 100mm (example: if correct length should be 700mm with the 04 bar would need to be adjusted to 600mm)
- Extend the kites rear pigtails by 100mm
- Using above pigtail lengths - extend the Brake Leaders by 100mm
This is the key reason why there was so much confusion with the PL bar setups and the kite stalling issues.
The Brake leaders for 03/04 bar are the same length, but the 04 bar trim adjuster is longer than the 03 bar.
(It is the same length as the adjuster used on the Zero4 bar.)
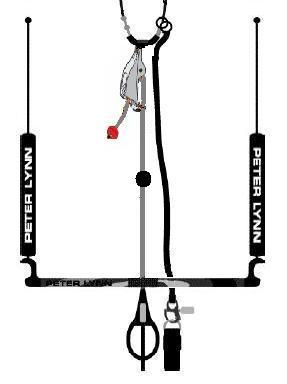
Control Bars - Zero4/5 - as supplied with GII's, Bomba's, Phantom's and Venom's
Trim Adjuster Strap = 260mm adjustment
Leaders = 840mm from the bar connection to end knot (780mm for pigtails with no extra pigtail knots added)
Bar movement = 370mm
Depower Line total length (Extended) = 850mm (LE connections to Bottom Chicken Loop Stop)
Depower Line total length (Full depower) = 600mm (LE connections to Bottom Chicken Loop Stop)
LE leaders = ??mm LONGER than TE
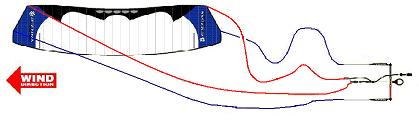
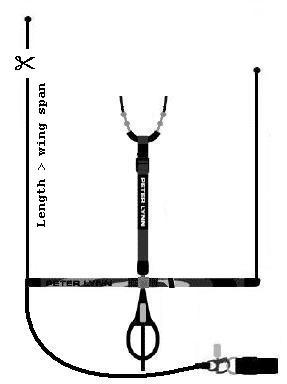
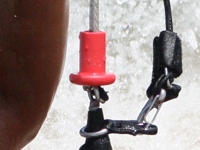
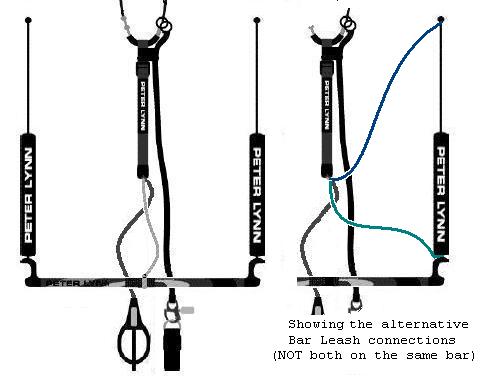
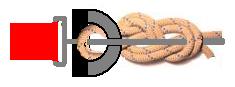
Safety Warning - DO NOT USE the 'D' (Leash Guide) ring fitted on the rear of the Trim Adjuster Strap to pass the Kite Safety Leash through. The safety leash should be fitted as shown in the colour image above.
Why...??? There is a VERY high risk of it jamming if the leash is fed through the D-ring when the kite is released to the
safety leash. Trim Strap and kite safety leash gets tangled or the knot which attaches the Safety Leash to the flying line gets caught. End result is that the kite stays powered up. The kite will not flag out and float to the ground as required.
Authors Note: I have had this happen when using a Zero4 bars on a F-ARC 1600.
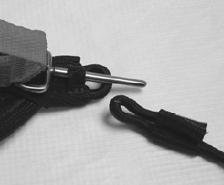
Another improvement is to replace the red stopper where the flying line attaches to the safety leash with a S/S ring. See 03 bar information and how the safety leash is attached.
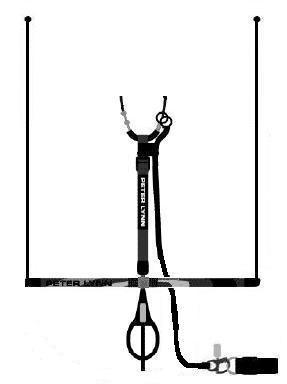
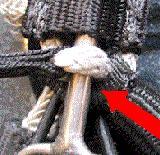
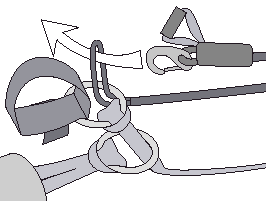
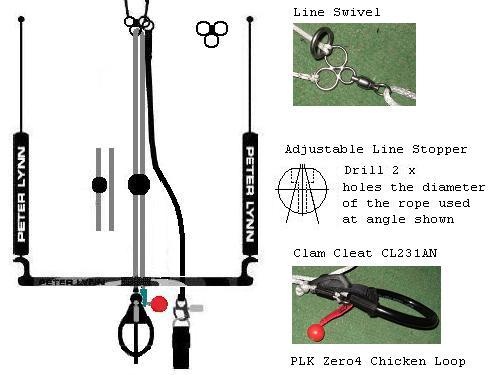
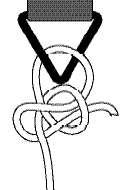
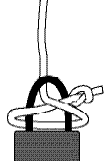
Assembling the Chicken Loop you MUST make sure the release pin passes OVER the webbing loop as shown below.
Safety Warning - The Zero4 Chicken Loop - failed a French Kite Safety Test (introduced 1st July 2005) which requires the Chicken Loop to release when loaded to 300kg with a force of no more than 10daN.
Authors Note: I have had and witnessed the Zero4 Chicken Loop fail to release on first pull in an emergency situation and heard of others. To this, many people have replaced their Zero4 Chicken Loop. Many replace it for an Ozone or the Flexifoil CBX50 (Ref No: 76084) chicken loop and depower line which releases the depower line using the original depower line pin release - not a chicken loop - 'loop' release.
Zero4 bars can also be upgraded with the new Zero7 c/loop quick release and depower line.

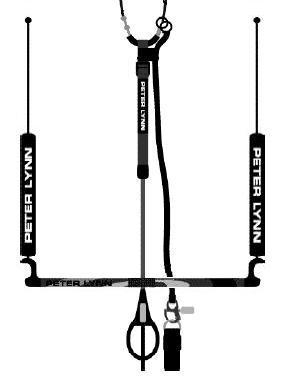
Control Bars - 07 - as supplied with the Venom II & Scorpion

Trim Adjuster Strap = 260mm adjustment
Leaders from the bar connection to O/S handle = 300mm
Leaders from O/S handle to Rear line connections = 570mm
Total Leader length = 870mm
Bar movement = 330mm (default) 370mm maximum
Depower Line total length (Extended) = 987mm (LE connections to Bottom Chicken Loop Stop)
Depower Line total length (Full depower) = 720mm (LE connections to Bottom Chicken Loop Stop)
LE leaders = 50mm LONGER than TE
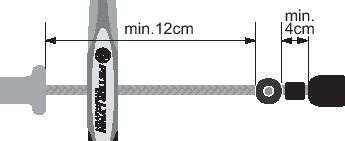
12cm minimum is required so that the safety release can work correctly.
4cm minimum so that the velcro connection point can spin freely.
WARNING: Do NOT over tighten the stopper ball as it may damage the depower line. Only tighten until the ball cannot move along the line.
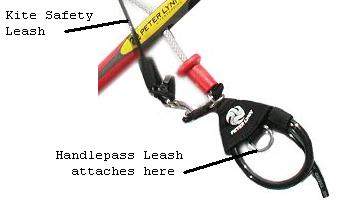
Safety Warning - Check your setup - DO NOT attach the leash to the safety leash attachment on the
self landing handle, but attach it directly to the S/S ring where the self landing handle is attached to, as shown in the picture below.
DO NOT attach ANY leash using this  or any similar type of connector ABOVE the bar. There is a VERY HIGH risk of lines getting caught in the clip which will prevent the kite from 'flagging out' when released.
User Warning: Please note due to the design of the TopHat (Push to Release) safety system implemented to comply with the French Kite Safety Rules (NF S52-503 July 2005 Kitesurf) requiring a force of 10daN maximum to release the kite it is possible to release the kite from the chicken loop just by knocking or catching your hand or cloths on it.
NOTE: To reduce the chances of this happening reverse the position of the Red TopHat release cover so it is as shown below.
Control Bars - 09(Navigator) - as supplied with the Charger


Trim Adjuster Strap = ?mm adjustment
Leaders from the bar connection to O/S handle = ?mm
Leaders from O/S handle to Rear line connections = ?mm
Total Leader length = ?mm
Bar movement = ?mm (default) ?mm maximum
Depower Line total length (Extended) = ?mm (LE connections to Bottom Chicken Loop Stop)
Depower Line total length (Full depower) = ?mm (LE connections to Bottom Chicken Loop Stop)
LE leaders = ?mm LONGER than TE

Control Bars - Non Peter Lynn
Non PL control bars often have Trim Adjuster Straps of less than 200mm.
Using such bar setup, has a big effect on the usable wind range and may require lots of tweaking to get full range from the kite.
One method has already been highlighted above, by using Extra pigtail knots.
Major disadvantage is that you need to land the kite before adjusting them.
If using Non PL bars a better option would be to use a Clam Cleat setup. You can then set any adjustment you wish.
Adjust your rear leader lines to match the Front connection points - Both Front and Rear Line leader end knots should be roughly level as shown in the above diagrams. Trim strap fully out (No depower) and bar pulled fully in.
If not...
Rear lines are longer - Add another knot lower, or move the current knot position closer to the bar.
Rears lines are shorter - Add longer rear leader lines or use extensions either on the kite or the Brake Leader lines if you are unable to replace them..
Or adjust the "chicken-loop" line to suit. There is no rule for chicken-line length, except you need to be able to reach it when the bar is pushed out. But a shortened depower line reduces the kites usable wind range.
DO NOT cut your lines for the required length differences. Its
recommended that you keep the 4 flying lines equal length this then allows any bar and line set to be used on any of your kites.
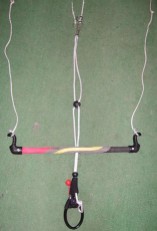
Control Bars - Clam Cleat Bar
 One example using a CL253 and stopper ball.
A clam cleat setup can be used as a direct replacement for any PL bar and able to give the same amount of adjustment.
If building this setup from scratch it is best to use the dimensions from the 03 bar as a starting point.
There are a few options when building one which are:
1. Use the original Depower Rope and replace just the Trim adjuster strap.
2. Replace the complete Depower Rope and Trim with the Clam Cleat and long depower line fitted with a adjustable bar stopper.
Control Bars - Free Bars
The FreeBar is a setup where the depower rope does not pass through the center of the bar. The bar is allowed to move free.
Most riders who use this setup often add an extra line (3mm bungee) to act as a released bar retainer or bar leash. This extra line is normally attached from the center of the bar (or an alternative connection is from either end of either rear leader) to either end of the trim adjuster (if fitted) so if you let go of the bar it is still within reach. The length of stretchy leash to use is very much dependent on rider and bar setup - To long and the leash can get caught around the bar or even your wrist and spreader bar hook. To Short it reduces the kites performance and limits the amount of bar movement.
To launch unhooked you take hold the "chicken" loop with one hand, & the center of the bar in the other.
To launch hooked-in is slightly less unsafe with a freebar, as the extra bar movement gives you more control over the kite's power. But this method of launching is still not recomended.
Other FreeBar examples are to use no trim strap. Once you setup the kite to your arm length you can
control the amount of power/depower just by moving the bar.
WARNING: - When attaching your Kite Safety Leash and Chicken Loop they BOTH should pass BEHIND the bar. The Bar Retaining Leash MUST pass infont of the Kite Safety Leash
Note: This type of setup is NOT recommended for beginners.
Control Bars - Custom Designs
This Design is based on the control bars available for some of the Bow/SLE type kites.
Materials Needed:
depower rope is 5mm (3/16") Amsteel or similar.
25mm (1") Plastic ball with 2 holes (depower rope diameter) drilled at an angle to create a Y shape.
20mm (5/8") Plastic Ball stopper
CL231AN Clam Cleat with 2 5mm x 20mm S/S nut and bolts
Zero4 bar and Loop release Zero4 Chicken Loop.
How to:
Drill the 2 required holes in the Stopper Ball.
Lay the bar out and take notes of the dimensions for the depower line and position of the front line connections.
Remove the Chicken loop and attach the CL231AN Clam Cleat to the back of the C/L just below the loop used to attach the depower rope
Cut required length of Amsteel line and melt the ends. Pass one end up through the bar, through the stopper and swivel before passing the rope back through the stopper, bar and finally the Clam Cleat.
Attach the loose end of the rope to the Chicken loop and line up the swivel so that the front line connections are at the same distance as the original front line connections were from the bar.
Pull the rope through the Cleat and with all lines straight tie a line stopper to prevent the rope getting pulled back through the cleat when released.
Test the bar from an overhead support with just your own weight that everything is secure and working correctly before testing the setup with a kite.
If all is good attach the front lines to the swivel, and test the setup using a kite.
It is also possible to just use an adjustable stopper on one line (attached to the chicken loop) The bar will then act like a standard bar only allowing it to move a preset distance. Stopper position is not adjustable as with the 2 line stopper.
Note: Designing and modifying bar setups is NOT recommended for beginners or anyone who doesn't know what they are doing. The choice and use of the wrong materials will result in equipment failure and/or serious injury.
Control Bars - Pulley Bars
These need slightly different settings than a standard bar. The trim strap is used to keep the kite powered as the kite is flown with no sheeting (Like a 2 line kite on a bar).
From the 'regions' diagram the control bar needs to operate just as 'region 2' between the Min. & Max. trim adjustment.
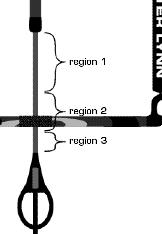
When setting up a pulley bar, adjust the trim strap fully out so kite would be fully powered. Adjust the control bar rear leader lines so that lines are tight, but not enough to stall the kite. (On the original Guerillas an extra knot on the front pigtail is needed (above normal connection point) to prevent the kite from stalling. This is with a PL 03 control bar.) When calculated, the
brake leader lines need the connection knot on the bar to be around 30-50mm shorter if you don't add the extra pigtail knots. Adding an extra pigtail knot will effect your normal bar setup, as it will not allow the kite to stall when the bar is pulled in.
Bar & Line Settings
ALL flying lines should be of equal length, size and rating.
4 x 300Kg @ 30m - minimum line strength should be 2½ - 3 x flyers body weight
Example: 75kg x 3 = 225 minimum line rating would be 250 or 300kg
All ARC's should be able to fly off just the front lines and sit directly over head when used in their correct wind range.
If when launching the kite stalls and sits at about 45° check the pigtail lengths against the figures above. If they are similar then you need more wind to allow the kite to perform as it should. The kite will still be able to fly in lower wind but will need far more pilot input to keep the kite moving to generate the
lift/power. Wind speed may not be enough for Kitesurfing or Landboarding.
How to check your setup
Put the kite at the zenith
Pull the depower/trim strap all the way in.
Bar positioned at the top knot - Back lines should be slack (No tension).
Adjust the trim strap out for full power.
Bar positioned at the top knot - the back lines should be under slight tension.
Pull the bar fully in, down to the Bottom knot - Kite should start to stall.
No depower/trim and fully sheeted (Bar pulled in) the LE connections should be level with TE leader
knots. (for 03/04 PL bars and Zero4 bars if the rear line leaders have been adjusted shorter else there may be
up to 210mm difference between both sets of connections)
The Kite Stalling test:
If the kite doesn't stall when the bar is pulled in, lengthen the front pigtails.
If the kite stalls too much, shorten the front pigtails.
There is no rule as to depower line length, though as shown
earlier the default length is 370mm of bar movement.
Length of the line should still allow you to grab the bar and adjuster when trim strap is fully out. If adjusted you also need to adjust the Rear line connections by the same amount.
The Depower Line
The depower line is divided into 3 zones:
Neutral - Bar is resting at the top knot.
Normal Riding - Middle 2/3rds
Stall - Bar is pulled down to the bottom knot.
Depower line is made with 6mm or 8mm diameter Amsteel, Spectra, Excel 'D' or other similar rope.
De-power Line connections and knots used
03/04 connections
It is also possible to make a depower rope suitable for a pin release by using just a length of rope, you don't need the sewn loop and pin retainer. You need to use a Double Figure 8 knot as in the diagram below.
Form the fig8. knot as shown. Pass the short loop through the small top loop on the chicken loop. Pass the release pin through the depower rope loop
in-front of the chicken loop and push up behind the 2 diagonal locking lines as seen in the image above.
Zero4/5 connections
Zero7 connections
Please Note: ALL Chicken Loops can be replaced/upgraded to a Pin Release type.
How to Check your lines
DO NOT attach all the lines to a fixed point, and just pull them tight. The lines may have different tensions even though they look the same length.
NEVER pull the lines tight to measure their lengths, let the lines sag. Look down the lines and watch the movement of the lines - they should all be the
same length and move by the same amount..
How to Stretch your lines
From a fixed object (solid fence post) attach 4 leader lines of equal length and strength rating.
Larkshead the lines to the fixed leader lines while the other end of the flying lines are attached to your bar.
Pick up the bar and tension the lines to see what differences there are in each.
If there is a difference - enough to make steering a problem the lines may need stretching.
Note: Each line has to be stretched on its own, NEVER as pairs or quads.
Mark the ground where the bar is, then with both hands PULL on the side of the bar which
has the shortest line (while trying to break the line)
If it breaks - replace it. Better to have a line break while testing than
when the kite is in the sky.
Use all the strength in your body... Release the tension and
repeat a minimum of 20 times for EACH
individual line.
Stretching front lines requires a
piece of bar passing through the loop at the end of the line in order
to just pull one line at a time.
When the lines have been stretched, recheck line lengths as
the connection loops may now need adjusting.
Setting line lengths
If the lines require adjusting, make note of the shortest
length line and use that as the default. Shorten the other 3
lines to match the default length.
If the lines are equal pairs you also have an option of
adjusting Brake leaders or kite pigtails to compensate.
To adjust lengths you have a few options:
- Ask your local kite shop to shorten them buy the required distances (if they offer this
service)
- Adjust the leader lines or adjust the knot positions until all 4 lines are equal.
- Adjust the knots on the kite "pigtails" - NOTE: You will
have to do this on ALL the kites if you use just one
bar.
- Depending how the loops are formed remake them yourself.
Set-up with the chicken loop against the bar and trim strap set to full power - all lines
should be equal. (Note: not if you are using the Zero4 or
Zero7 control bars)
How to make the line end loops
Sewn Loop


Add sleeving and form a loop as shown at the required point.
Allow 3" of line to form the loop. Then sew with a zigzag stitch through both line and sleeving. This is a far better
method than a tied loop as below. The extra knot is a weak point
because the tied knot takes full line tension before the
larkshead knot does. A sewn loop is stronger as there is only
the larkshead taking the full line load.
Safety Note: this method is not recommended on thin lines
unless you can guarantee the stitches pass through both line and sleeving for every stitch.
Tied Loop

Tie an overhand knot at the end of the line after fitting the sleeving - form a loop
at required distance and tie knot as shown.
BOTH methods work well and down to
personal preference. Tied loops are normally found on thinner
lines where stitching is difficult/impossible. When buying lines, sewn loops normally also
means the lines are pre-stretched. You are advised still to
check lengths are all equal when first attaching the new lines
to your kite.
Stitched loops are normally preferred over tied loops because there is less risk of them getting caught on another line.
Control Bar Stopper Ball Fitting.

This device is added to the flying line which has the safety leash attached to, which allows the kite to
flag-out when the bar is released or safety/chicken loop is released. It is designed to stop the bar traveling
to far up the line and reduces the risk of tangled lines.
To fit correctly you need to position the stopper so that the kite when released will lay flat. If you only have one bar, set the stopper for your largest kite.
Best method and easiest method is to, in light winds setup your kite and launch as normal
unhooked. With the kite downwind, release the bar and allow the kite to flag-out and land.
Secure the safety line, then walk to control bar.
Move bar away from the kite (parallel to the line) until the downwind back line starts to lift the downwind tip.
Note bar position.
Now move to the kite, remove the front line and add stopper. Reconnect line before positioning stopper.
Gently slide the stopper to desired position, making sure that the kite remains flat on the ground.
Safety Note: it is always best to allow some extra distance (anything
up to 1 meter) so that there is no chance the kite can stay powered up when the bar/safety is released. If this happens the kite will spin very fast dragging you downwind, or may put too much tension on the stopper and snap your line which will mean you will loose the kite.
When positioned and secured correctly, the line used with the safety leash should be tight, ALL others should be slack and the kite laying flat on the ground.
Relaunch and check for correct operation.
Control Bar Stopper Ring Fitting
does the same job the stopper ball...
Slide sleeving onto the line you wish to attach the stopper then
larkshead the ring as shown in following diagram, using the same
method as above to get correct stopper position.
ARC Safety Systems
The ARC's use the 'Sliding Ring' system on one of the Front lines, the Zero7 bar uses a rear line sliding ring system.
 <-- Kite
Safety Leash attaches to this ring
<-- Kite
Safety Leash attaches to this ring
Safety Note - Attach the safety leash with a Larks-head
knot DO NOT use a clip with a sprung loaded gate. There is a
possibility of any one of your lines or leader lines getting
caught this will then prevent the kite depowering when the
kite is released to safety.
 setup as on the Zero4
depower strap
setup as on the Zero4
depower strap
As already mentioned earlier - DO
NOT feed the Safety Leash through the D-ring
attached to the depower strap on the Zero4 PL Control Bar or
if you have modified your bar with the Zero4 adjustable strap.
Flight adjuster
The flight adjuster is in the center of the kite, on the webbing running between the two rear line attachments and can be found by opening the inflation zip. This changes the feel of the kite and can be fine tuned to suit riders preference.
The standard default setting is with the adjuster pulled in 25% or quarter-way between the min. and max. setting.
Tightening the adjuster (the strap is pulled in further) will give the kite slightly more power a more solid feel, with less depower overall.
Loosening the adjuster (the strap is released further) will make the kite produce less power with a lighter bar pressure.
In extreme light winds or if the kite is wet, the kite flies better with the adjuster loose.
If you find the kite is stalling check the position of the rear strap and release slightly - the strap may be wrongly adjusted for the current wind condition you are flying in.
Steering adjusters
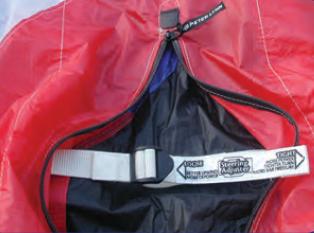
These are only on the Venom 2, Vortex & Scorpion ? They are positioned near the wingtips which can be reached by opening the inflate
zipper.
The standard default setting is with each adjuster pulled in 50% or halfway between the min. and max. setting.
For a tighter turn, more bar pressure and overall more power, pull in the adjusters.
For a better upwind performance and overall more depower, let out the adjusters.
The standard setting is about halfway.
Note: always adjust both sides of the kite, and make sure they are set equal.
How to Launch your ARC - solo
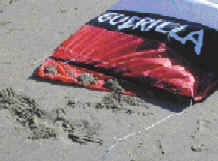
Sand the upwind wing tip as seen in the above photo or use a plastic water bottle if inland.
Another alternative is to use a Kite Launching Sandbag - A A4 sized drawstring bag filled with just enough sand to prevent the kite from moving.

When the kite is fully inflated...
 or
or 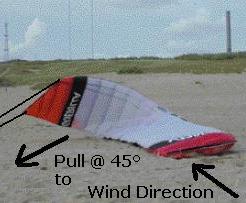
Allow the Downwind tip to lift by walking back and away from the kite at an angle of 45-60°. As the downwind tip rises the kite will take its shape and the upwind tip should move downwind slightly removing the sand or water bottle. When kite is finally off the ground, fly the kite up the edge of the window.
NEVER launch straight Downwind in winds over 8 knots.
Launch with the kite unhooked and your kite safety leash attached. If anything goes wrong during the launch you can just release the bar.
Launch Safety
- If in doubt don't fly...
-
Checking lines - check, check & CHECK again....
- NEVER launch a kite with short back lines - The kite could launch Fully Powered up.
- Always launch with the trim strap pulled in - Kite should be depowered.
- NEVER launch straight downwind as you would and open cell foil.
- Assisted launch - make sure your helper knows what they are doing.
Riding Un-hooked
To ride unhooked you need to adjust the trim strap before the move you plan to do, so that the kite does not stall when being flown against the bottom knot (bar pulled in)
The other method is to add an extra knot on the front pigtails above the knots used for the flying line connections. This shortens the front lines by about 1" and doesn't allow the kite to stall. See Pulley bar setup above.
on land: Extend the kite safety leash - connect
handlepass leash to kite safety leash.
on water: Setup depends on the type of chicken loop you are using.
Pin release type (Depower line disconnects on release - chicken loop stays connected to spreader bar) connect Handlepass leash to the chicken loop and then the kite safety leash attaches to same chicken loop.
Loop release type (loop releases from spreader bar on release) connect Handlepass leash to the chicken loop and then the kite safety leash attaches to top end of the handlepass leash and NOT the Chicken loop.
Note: Handlepass/Suicide leash connections may differ to those shown below.
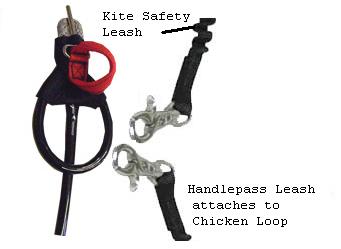
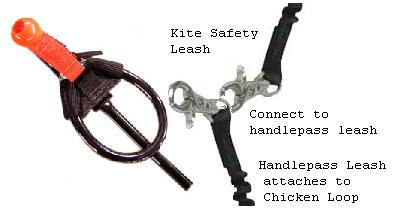
If you miss a handlepass and let go of the bar you can still release the kite to the kite safety leash by pulling the handle/suicide leash towards you and then pull the normal chicken loop release to depower the kite.
Using a Handlepass or Suicide leash - the kite will NOT depower...
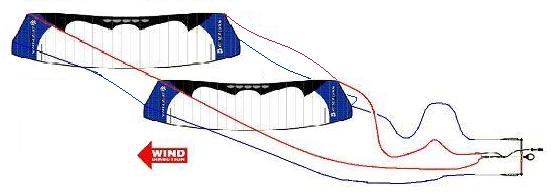
How to stack ARC's
For best results when stacking ARCs it is recommended that you use lines half the wing span of the kite above or to use extension lines of around 5m in length.
When setting up the stack make sure the kite above has slightly longer front lines or shorter rear lines. The kites AoA must be that the above kite is able to catch slightly more of the wind. A front and rear line difference of 4" is a good starting point.
A few ways to achieve this are:
1: Manufacture dedicated stacking lines, when the required lengths are know.
2: 4 fixed length lines, and adjust the offset by adding a knots on the Leading Edge pigtails of the lower kite.
3: Make a set of extension lines with one pair of fixed length - rear lines and one pair which has an adjustable loop (fig 8 knot) - front lines
4: Add pigtail extensions to create the required offset.
Setting up and tuning the stack takes time...
When the stack is in the sky all kite MUST fly as if one, meaning every kite should turn at the same time and not effect any of the others by creating drag.
The top most kite is the main kite and determines the turning speed.
The lower kite(s) assist the top kite to create the power and lift, so choice of kites for a stack has a big effect on its performance.
You can stack any ARC but same model kite stacks work best compared to a mixed ARC stack. Example: All Venoms or all Phantoms work well... but a mixed Phantom and Bomba stack not so well, due to the Phantoms high Aspect Ratio and Bombas low Aspect Ratio and other differences between the kites.
Using same size kites also reduces the stacks performance as the lower kite is not in its true shape (the tips are pulled in slightly) which effects the stacks turning.
For a stack to work well it needs to have the biggest kite at the top, smallest on the bottom. with a size difference of 1, or 2 max. Example with a range of kites 18, 15, 13, and 10m - It is possible to stack the 10 & 13, 18 & 13, 15 &13 etc... but not the 18 & 10 due to the big difference in size - the bottom kite (10m) would be pulled to much out of shape so that the kite starts to flatten out.
Examples of ARC Stacks:
To launch a stack, lay out the top kite then place the lower kites on top of or just near by so the extensions just reach the kite without much slack and the LE vents all face the same direction.
When connecting your lines, make sure the UPWIND REAR LINE EXTENSION is going UNDER the bottom kite so it won't be in front of the bottom kite when flying.
If the rear lines of the upper kite have too much tension the smaller kite will collapse in the turns.
Launch as normal - at the windows edge.
But unlike single ARCs it is recommended that you having someone helping to lift the tip as it stops lines getting wrapped etc.
Frequently Asked Questions
Lines
What is the maximum line extension length I can use ?
Answer: 200ft or 60m straight up is the UK official kite flying height limit. 30m + 27m as you also need to allow for the Kite.
Do my lines all need to have the same strength rating ?
Answer: Yes, all 4 lines should be the same. 2½ - 3 time riders bodyweight minimum.
What line lengths are best when flying ARCs ?
Answer: Current line standards are: 30m, 27m, 25m, 20m
Shorter lines are best for wave riding, for flying in higher wind speeds and kite loop type tricks.
On the larger kites, using short lines may pull the wing tips together which will effect the kite performance and handling.
As a rough guide - wing span + half wing span would be minimum line lengths, with 15m being the shortest length.
Adjusting line lengths to increase/decrease kite size ?
Answer: A very rough guide - 3 meters of kite line = 1 meter of kite.
Example:
10 meter kite 24 meter lines = 9 meter kite
10 meter kite 27 meter lines = 10 meter kite
10 meter kite 30 meter lines = 11 meter kite
Can the choice of lines effect the kites Performance ?
Answer: Yes, line drag is proportional to its diameter, double the wind
speed, the drag created quadruples.
How can I stop my lines getting all twisted when winding and unwinding my lines ?
Answer: When removing lines from the kite, lark-head the lines together for each side.
Is there a line replacement interval ?
Answer: No, there is no recommended replacement interval, if the lines look
excessively worn replace them. The kite leash line (the one which passes through the sliding ring) needs to be the line in best condition to prevent a runaway kite.
How do I connect line extensions ?
Answer: Connect each of the lines extensions as in the diagram below.
Does it matter that my lines aren't exactly the same length ?
Answer: Length difference of just 1" will have a big effect how the kite behaves. If the line difference is on the LE lines when the kite is left at the zenith it will slowly drift towards the side with the shortest line.
Justed checked my lines an sections look thicker than others?
Answer: If your kite has been left flapping in gust wind on the beach - non coated or sealed lines can get sand to build up in the core. This sand should be removed ASAP as it will act like sandpaper and wear your lines from the inside.
Control Bars
I have a few ARC's and only want one bar - which size is best ?
Answer: 50cm is the average size bar and will work on all the kites.
Can I use my Ozone Frenzy bar to fly my ARCs ?
Can I use my Flysurfer bar to fly my ARCs ?
Answer: No, the brake setup is totally different. The bar will need major modifications to allow it to work correctly. It is recommended that the control bar uses the sliding ring setup on one of the front lines.
You will not be able to depower the kite as you can a Ozone Frenzy/Flysurfer or any similar kite by distorting the Trailing Edge.
I am thinking of buying another Peter Lynn ARC. Will my current Peter Lynn bar work on the new kite ?
Answer: Yes, the Peter Lynn bars will on every ARC they have produced so far. But earlier '03' bars have slightly less depower available than if you are using a Zero4 or later bar. They may also need setting up correctly for each of your kites. Make any adjustments at the kite, this way then allows the bar to be used on any of your kites.
My Depower Rope wears very quickly ?
Answer: Check that the hole through the centre of the control bar doesn't have any burrs, rough surfaces or sharp edges. Remove carefully with a needle file, or remove depower rope if a larger file is needed.
Can I make my bar shorter ?
Answer: Yes, it is possible to shorten your bar.
You need to remove the rivets securing the end covers (these may also be glued in place)
Mark the new bar length and cut to size (Each half of the bar MUST be exact)
Trim the bar coating and re-secure the bar end caps, making sure each side of the bar remains equal.
Control Bars - 03/04
The plastic Trim Strap Buckle has broken can it be repaired ?
Answer: No, it must be replaced (requires unstitching the trim strap - It is recommended to replace the whole trim strap. The latest adjuster strap has a much stronger buckle. Or replace with a clam cleat setup.

Control Bars - Zero4
The original Zero4 Chicken Loop sometimes fails to release at first pull ?
Answer: Users of Zero4 bars often replace the Zero4 Chicken Loop and depower line for the original style pin release where the depower rope releases - not the chicken loop loop.
I have the Zero4 bar, there is a new Zero7 available do I need to upgrade ?
Answer: No, the Zero4 will do everything the Zero7 can do, except for the spinning leash and upgrade to the Safety Release.
Control Bars - Zero7
How well does the depower work when letting go of the bar with the lease connected to the small steel ring located within the chicken loop on the 07 bars.?
Answer: It doesn't... The loop is for attaching a suicide/handlepass leash NOT a kite safety leash.
On all the ARCs you are flying it will be the same, the kite will NOT depower - if the kite is not directly overhead you will get lofted, dragged or pulled forwards at high speed as the kite powers through or across the window. If just connected to the chicken loop it would be like doing a direct downwind launch by pulling on the 2 front lines but with the kite already powered up.
Why does the Safety Release keep releasing.?
Answer: The safety Release system was redesigned to comply with French Kite Equipment Regulations which require a release force of 10daN maximum making it possible to detatch the kite from the chicken loop/rider just by knocking or catching your hand or cloths on it.
NOTE: To reduce the chances of this happening reverse the position of the Red TopHat release cover so it is as shown below.
Launching
Why can't I launch my ARC in low wind. ?
Answer: A few possible reasons
1: There's not enough wind for it to fly in.
2: Fully release the internal strap if one is fitted.
3: Kite setup is wrong, see above and recheck your setup.
4: Not enough inflation due to design. Newer kites require almost full inflation with good internal pressure to hold the shape of the kite.
I am not on the beach how do I sand the tip to hold the kite ?
Answer: You can use a sandbag, large bottle of water or even
a landboard - but there is a risk it can get caught on the lines when the
kite launches.
My launch site has sharp rocks and pebbles and I don't want to damage my kite ?
Answer: Use a cheap plastic tarpaulin/ground sheet which is larger than your kite when layed out flat. Weight the corners and edges down with small rocks and use a kite sandbag to secure the kite for launch.
The downwind tip keeps flapping making it hard to launch ?
Answer: When its very gusty the downwind tip flaps about - to make launching easier you can sand the downwind tip.
What are are "Launch Assistants" and do they work ?
Answer: They are small velcro tabs located on kites bottom skin at the end of each inflate zip. They work by holding the lines and preventing them from getting under the kite if it is flapping around in the wind. They make launching easier in gusty wind.
Can I add the launch assist velcro tabs to my kite ?
Answer: Yes, they can be added to any ARC kite.
How do I add the launch assist velcro tabs to my kite ?
Answer: Cut a piece of velcro about 1" long, push together and sew one of the ends together. Peel apart to check. With open ends of the velcro facing towards the TE of the kite stick the hooks piece on kite with double sided tape just above center zip. If happy with the final position sew on to the kite skin through both the velcro and tape.
How do I get air into the kite - it only half fills ?
Answer: Have you closed the deflation zip.
Answer: Close the zips, then roll the kite so that all the air in the kite is moved upwind. Reopen the zip and allow the downwind half re-fill with air, or when half filled rotate the kite 180° to fill opposite end of the kite.
Having just launched my kite, it doesn't fully pressurize (inflate) ?
Answer: Check that the intake valves on the leading edge haven't become stuck behind the 1st braid which prevents air getting in yo the kite.
When launching, my kite gets no more than 10ft off the ground ?
Answer: Check the internal strap settings. Low or no wind the rear strap should be fully out to prevent the kite from stalling.
When launching the wing tips come together and then the kite then sometimes bowties ?
Answer: This is usually because the kite is not fully inflated, or sometimes if the kite is very wet and heavy and there isn't enough wind to support the weight of the kite properly.
Under inflation - This can collapse the leading edge inwards and often ends up twisting the kite into a bow-tie if you dont keep rear line tension until the kite fully pressurises. If you do get a bow-tie the kite acts like a windmill and gets self propelled using only half the LE to create a rotation (so will automatically spin) and will spin and keep spinning until you get it out the sky. Normally made worse if you pull in on the bar as the LE tips catch more of the wind.
The best way to deal with it and prevent possible injury is to pull the safety ASAP if you see the kite starting to spin in a way that it could go out of control.
A single bow-tie twist at launch is recoverable if the kite hasn't started spinning but takes a bit of practise to get right especially in higher winds.
Landing
When landing solo is there any way to stop line tangles and from spinning when using the safety leash ?
Answer: No, but there are ways to reduce it
1: Fly the kite to the edge of the window before releasing to the safety.
2: Release when the kite is at the zenith. The bar will move back towards you as the kite falls so lines get less tangled.
3: Add a Bar stopper to the leashed line.
4: Use a front line ring setup. A rear line release allows the kite to spin more.
My Kite Doesn't Fly Correctly ?
Why doesn't my ARC turn correctly - Kite turns to the Left when I pull the right hand side of the bar ?
Answer: You have the LE (from/power) lines connected to where the Rear lines should be connected. TE (back/brake) line should be connected to the ends of the control bar.
Why does my kite wander side to side when flown overhead and wont Auto-zenith ?
Answer: The rear lines are too slack
Why does my kite surge, over-fly then drop back into the power zone. ?
Answer: It is due to very gusty wind conditions.
Why does my kite sit to far back in the window ?
Answer: The rear lines are too tight.
Answer: The Leech strap is too tight for the wind speed you are flying in. (Phantom, Venom, Vortex) You need to loosen the leech line 'Fully Out' for light winds. (<8 knots)
Answer: The kite is very wet
Answer: Check your spars are fitted correctly and are not broken/split.
Answer: The kite has far too much sand inside it, or on the outer skins. Allow to dry and brush it off or empty kite of sand
Why does my Kite keep stalling ?
Answer: Control bar/kite setup is wrong. Check pigtail lengths.
Answer: The kite pigtails are not set to the correct length for the bar you are using.
Answer: You are flying the kite with too much rear line tension. ARC's normally fly with slack rear lines, when at zenith and no bar tension.
Answer: You need to adjust in the trim strap to slacken the rear lines.
Answer: Check your spars are fitted correctly and are not broken/split.
Answer: When flying in strong winds the rear line tension increases due to line drag.
Why does my kite turn away from the zenith when flown overhead ?
Answer: Check your lines are ALL equal length - ½" difference is enough to cause a problem.
Answer: Check a line hasn't got wrapped around on of the spar tips.
Answer: Check that you have used the correct pigtail settings and not connected to different rear pigtails (if your kite has 2)
Answer: Check that the wing tip skins aren't wet and have stuck together.
Answer: Check your spars are fitted correctly and are not broken/split.
Answer: Check that the braids across the kite are all equal distance within the cells. (Short on the Left - kite will turn towards the right)
My kite turns away from the zenith and has been getting worse over last few sessions ?
Answer: Check your spars are not broken/splitting. Replace spars/broken section if required.
No air is getting into the kite when in flight ?
Answer: Check that the air intake vents aren't stuck shut or trapped under the #1 braid nearest to the LE. If its snowing check the vents aren't covered or filled with snow.
Why does the kite turn to the right/left and not stay at the zenith ?
Answer: If there is nothing wrong with the setup and line lengths, then check the kite isn't filled with sand which has collected at the tips, if the kite has been wet check that the skins aren't stuck
together at the wing tips.
Answer: Check your spars are fitted correctly and are not broken/split.
My kites wing tips keep collapsing, kite looses it shape and easily bow ties ?
Answer: Remove and check the condition of the spars. Replace if damaged.
General Setup Problems ?
I have just connected my Zero4 bar to my kite and it looks like the brakes lines are far too long, and there is no/very little steering ?
Answer: The problem is the way the kite is setup as explained in the above notes.
Check Kite Pigtail lengths and Control bar set up.
When flying my kite I feel way over powered but have the depower trim adjuster pulled in ?
Answer: Check your front pigtail lengths, they may to long for the higher wind range you use. 1" makes a big difference to your depower setting, as the kite has a bigger AoA.
When the kite is overhead my bar sits at an angle ?
Answer: One of the lines is wrapped around the tip of the spar.
Answer: Brake lines are not of equal length.
Answer: Brake Leader line lengths/Pigtail knots on each side of the kite are not equal
Why cant I depower my kite more ?
Answer: This can be one of a few things... Are you using a Peter Lynn bar setup ? Are you connected to the correct pigtail knots ?
My kite has 2 rear pigtails - Which do I use ?
Answer:
Front attachment points give you more bar pressure and quicker turning and a little more depower. The negative - the kite
may stall in light wind.
Rear attachment gives you less bar pressure, less stalling and slacker rear lines.
Spars
Can I use bamboo as a spar replacement ?
Answer: Yes, but its not the best option. If you do use bamboo, tape full length with vinyl insulation tape to stop them destroying the spar pocket if they break, also add end caps to protect the pocket ends.
Can I use fibreglass tent poles for spar replacements ?
Answer: Yes, make sure they are of similar diameter. Cut to size and add end caps to protect the pocket ends.
What other products can I replace the original spars with ?
Answer: Fiberglass tubing, with an o/d of around 0.505" and an i/d of 0.417".
Answer: NOT - thin aluminium tent poles or tubing.
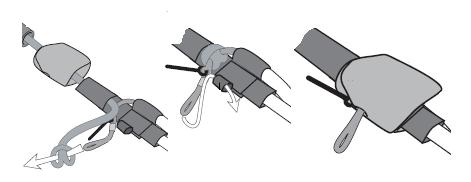
Cutting spars - How can I do this without ending up with splinters everywhere ?
Answer: Wrap the spar with masking tape where you are cutting it and Use a fine tooth saw.
Can I use spars from a different ARC ?
Answer: Yes, but they need to be of the same length or longer, which would then have to be cut to correct length for the spar you are replacing.
The brass ferrules on my collapsible spars have come loose ?
Answer: Re-glue with Loctite 416 or any other similar product.
How do I make replacement spars ?
Answer:
Materials needed:
- 10mm diameter Carbon Tube (length for 2 Spars)
- smaller diameter Carbon Tube which fits exactly into the 10mm Tube
- 10mm Brass Ferrules
- Loctite 416 (aka SuperGlue) or similar
- 10mm Nylon end caps.
Instructions:
1. Cut 10mm tube into 3 equal lengths * for each spar and smooth all the sharp edges.
* It is also possible to use 2 piece spars but these should be cut 1/3 and 2/3 or 60/40 not in half (50/50) as the center will be the weakest point.
2. Cut smaller Tube into lengths similar to the Brass Ferrules (not shorter)
3. Assemble so that the spars look similar to diagram below.
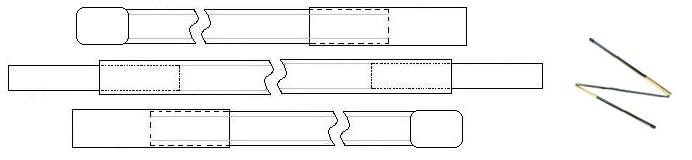
3. When happy glue and insert smaller tube into the larger tube so that roughly half is still visible.
4. Reposition then glue the Brass Ferrules as shown below.
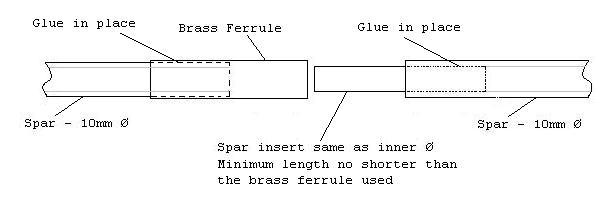
5. Allow to dry before removing excess glue and making sure everything fits together.
6. Fit end caps and assemble to check final spar length.
7. It is also possible to include a length of elastic down the center of the tube. This is secured with the end caps.
Why has my Aluminium Spars corroded/cracked ?
Answer: Aluminium alloys corrode and crack when exposed to salt water.
 Example of what to watch for...
Do I need to wash/clean Aluminium spars ?
Answer: Yes, Aluminium will eventually oxidize if they are not washed/cleaned after they have been subjected to salt water, it will eventually eat into the aluminium, weaken it and finally result in spar failure.
Should I replace my Aluminium Spars ?
Answer: Personal choice - But there is less risk of Spar failure if they are made of a single length of carbon or fibreglass and are not regularly cleaned and checked. Replace them if there is signs of heavy corrosion or cracks are visible.
Safety
Can I replace my Zero4 Chicken Loop with one which works better ?
Answer: Yes, the most common replacements are the Ozone or Flexifoil
chicken loops. Please Note: These are NOT direct replacements as you will also need to replace the depower line, due to the different design. The upgrade is to a pin release type which keeps the Chicken Loop attached to your spreader bar, they
don't release the loop itself. You can also change the depower
rope and chicken loop to the same as is used on a Zero7 bar
setup.
How can I tell if I am Overpowered ?
Answer: When the kite is above your head at the zenith, trim strap fully in (depowered) and you are unable to walk backwards. You should be flying a smaller kite.
Which Wichard is safe to use as a Quick Release ?
Answer: The Wichard model/type 2673 or 2674 ONLY
Where do I attach my Kites safety leash ?
Answer: Attach it to the front line which has the sliding ring. It should be attached using a Larkshead knot, NOT a sprung loaded clip as there is a risk of your lines getting caught and prevent the kite from flagging out when it is released. It will stay powered up possibly going into what is known as a 'Death Spiral' which is where the kite spins very fast due to uneven line lengths.
Do NOT use this type of connector to attach a safety leach to the sliding ring release above the
bar.
Suicide Leash Setup
What is a suicide leash ?
Answer: A stronger, often custom made leash which connects from the back of your harness to the chicken loop on your bar. It is designed so that you can do handle passes and not loose the kite if you miss the bar. If you do miss the bar the kite stays fully powered and will often drag you backwards at very high speed downwind. Its called a suicide leash because originally there was no Quick
Release safety. Some new setups now have a release which disconnects the leash from your harness.
What is a Handlepass leash ?
Answer: A leash which allows you to do handlepasses but is connected to your kites safety leash. If you miss the bar or let go the kite will fall out the sky depowered. Total opposite to a Suicide leash.
Is a Handlepass leash the same as a Suicide leash ?
Answer: No, they are similar but NOT the same. A Handlepass leash if used as a proper Suicide leash has the risk it will snap due to the forces generated by a fully powered kite.
Can I use a Suicide leash on land ?
Answer: Yes, but its not recommended (Its called a 'Suicide' leash for a reason) For your own personal safety it is better to attach the leash to the kite safety release to allow it to depower the kite.
Is there a setup that keeps the kite at zenith and depowers it when I miss a handlepass ?
Answer: No leash setup is available which allows this. Using a Suicide leash attached to the chicken loop will send the kite up through the power zone lofting you backwards downwind as soon as there is any tension on the front lines.
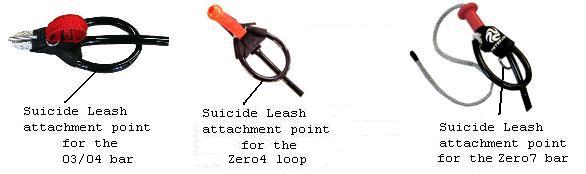
Where do I attach the Suicide leash ?
Answer:
Stacking Kites
What ARC's can I stack together ?
Answer: Almost all ARC can be stacked, but one thing to remember is the kites performance. A mixed stack may not work as well as a stack of same type ARC's. (Example: Guerilla/Bomba and Phantom)
Will a stack of 18m and 13m kite have the same pull as a 31m kite ?
Answer: No - It will pull more than an 18 but nowhere near the same as a 31m kite.- ?
What length stacking lines should I use ?
Answer: Normal length is 5m - 7.5m or minimum is half the smallest kites wing span. When the kites are on the ground they should lay flat. Too shorter lines will lift one of the kites tips which could then try to launch. If lines are too long the stack becomes unstable. When setup correctly all the kites should fly as ONE
Why does the lower kite collapse in the turns ?
Answer: The rear lines of the upper kite have too much tension pulling on the lower kite, adjust the lines so the rear lines are more slack. Every kite in the stack MUST fly as one.
Other Questions
There are lots of modifications posted on the web, do I need to add them to my kite ?
Answer: No, they are not needed, your kite should fly fine without them.
NOTE: Any modifications you do are 'at your own risk'.
What is the 1st, 2nd and 3rd Braid ?
Answer: These are the black webbing straps which span the kite internally - 1st Braid is nearest the Leading Edge then in sequence back...
- ?
Answer: ...
Kite Specific Questions...
S-ARC
What bar size do I need for my Kite ?
Answer: 50mm for a 630 or 840 and 65mm/75mm for a 1120 or 1510 kite
How can I make my kite turn faster ?
Answer: Use a longer Control Bar
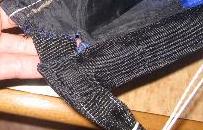
Answer: Adjust the position of the Rear pigtail by moving the connection point forwards and away from the TE. Measure and mark the webbing EXACTLY the same for both spars. Now burn a small hole above the spar through the black webbing with a soldering iron. Recommended distance for a 1120 ARC is 6-8" inches (15-20 cm). Attach a new pigtail leader-line through the hole and around the spar. Add a knots on this line then adjust for the correct setup length.
What are "flares" ?
Answer: They are extensions that attach to the wingtip spars to relocate the rear line attachment points forward toward the LE of the kite.
My kite doesn't fly over head, it turns left/right ?
Answer: Check if one of the spars is broken or split
Answer: Check the black braid along the trailing edge has not shrunk (possible when hot) - Remove and just restitch the trailing edge.
What is a TST ?
Answer: TST = Top Skin Tuck This is a modification to the top skin, sometimes needed when the outer skin has stretched (due to excessive UV exposure) and the kite will not fly correctly.
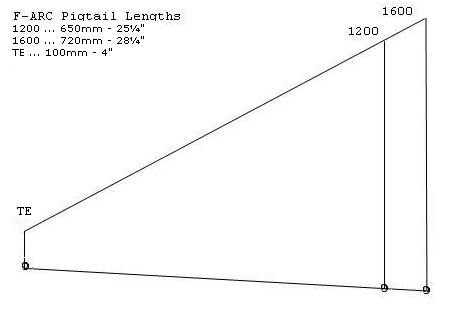
F-ARC
My kite stalls a lot - why ?
Answer: Rear line tension is to high, Set rear pigtail to 8" with a knot at every 1½". Adjust setup so that the rear lines are slack when fully depowered
Answer: With wind at <10 knots the kite has a strong tendency to stall, even with the back lines completely slack.
Answer: Check leach line is not to tight if your kite has one fitted.
Why does my kite bow-tie when I launch it ?
Answer: F-ARC's are Very High Aspect Ratio and needs to be FULLY inflated before launching to reduce the chances of this happening.
What is the Leach line Adjustment ?
Answer: If fitted (F1200) these are two separate lines that pass diagonally from the trailing edge about
8 cells in from the tips of the kite to a point about one third of the way forward from the trailing edge at the wing tip. These lines can be used to modify the shape and flying characteristics of the kite. Each side should be set to same adjustment which can be upto 100mm.
Guerilla
Are my Spars fitted correctly ?
Answer: Yes, if you insert the spar in the pocket opening where the first-to-close velcro flap is attached.

Does the Guerilla have an adjustable leech strap ?
Answer: No, the kite was not manufactured with one fitted, but a few riders fitted one to try and help improve the turning speed.
Important Note Fitting a leech line as below, may damage the kite. If in doubt - Don't fit this mod.
How do I fit a leech line ?
Answer:
Materials needed:
- measuring tape and pencil
- a big needle with an eye large enough for the dyneema line
- sticky back Dacron sail repair tape
- small needle and thread (not cotton)
- a length of dyneema/spectra flying line at least 1 meter longer than your kite's wing span.
Instructions:
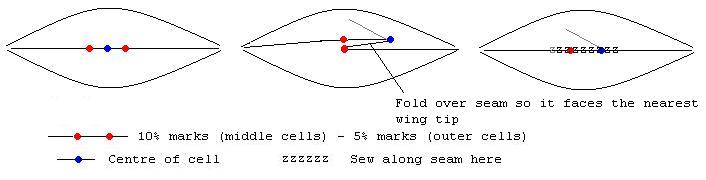
1. Lay kite out flat, measure each rib and multiply measurement by 0.65 (65%). Mark this point with a pencil. Repeat this for each rib up to the black panel. (G18 = 52.65 inches from the LE)
2. From the rear pigtail you use normally use. Lay a straightedge from the 65% point at the black panel to the pigtail and mark each rib at the straightedge. The marks should parallel the trailing edge up to the black panels, and then go directly to the pigtails.
3. Make 2 round patches with the sail repair tape, about 2" diameter.
4. Measure the kite's wingspan and divide by 3. Then select the ribs that are closest to the 1/3 and 2/3 point (G-18 = 7 panels from the tips)
5. Clean area and apply the patches at the 1/3 marks.
6. Thread the leach line from the top skin where the webbing from the pigtail meets the webbing for the spar.
7. Feed the needle and leach line through each rib at the pencil mark 10mm from the bottom skin.
8. At the 1/3rd point thread the leach line out the bottom skin and back through the bottom skin (passes 12mm over the cell seam)
9. Continue across the kite and leave 300mm excess at the tips and 150mm loose in the
center with kite out flat. Note: Both sides of the kite should be identical.
10. Double check everything before stitching the exposed lines at the patches to the kite through the patches.
11. With kite flat mark leech line at the exit point then mark every inch for 10 - 12"
12. Tie loose ends to the pigtails at required tension mark.
Note: too much leech tension will cause tip collapse.
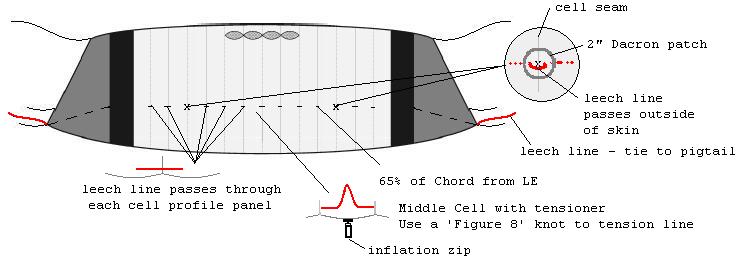
Recommended adjusted length is 5% of the total kite wing span
G10 - tips = 5" ~ center = 4" .. total = 14"
G13 - tips = 6½" ~ center = 5" .. total = 18"
G15 - tips = 6¾" ~ center = 6" .. total = 19½"
G18 - tips = 7" ~ center = 6" .. total = 20"
WARNING: If the kite inverts there is a possibility that the new leech line may rip up through some of the cell ribs.
Guerilla II
Does the Guerilla II have an adjustable leech strap ?
Answer: No, it is fixed across the kite at every cell.
Can the leech strap be made adjustable ?
Answer: Yes but it means major modification to the kite.
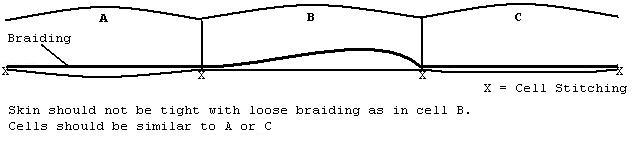
The strap need to be able to move freely in the central 6 cells.
Where the strap moves through the cells, theses need Dacron reinforcing to prevent the rip-stop wearing.
The internal strap requires extending, but not so that the central cell outer skin takes all the load.
Adjustable strap section and buckle needs to be added.
Why, when flying my kite it stalls to around 45 - 60° ?
Answer: Its due to the rear leech strap across the kite and a lower wind speed. The kites are designed to fly more in their upper wind range. To prevent the stalling you have to keep the kite moving in lower winds.
Bomba
Does the Bomba have an adjustable leech strap ?
Answer: No, it is fixed across the kite at every cell.
Can the leech strap be made adjustable ?
Answer: See same question in the Guerilla II section.
Phantom
Does the Phantom have an adjustable leech strap ?
Answer: Yes.
How can I get my Phantom to fly better in light winds ?
Answer: Fully release the internal strap
Will the TET mod work on my Phantom ?
Answer: No
When I launch the Phantom the wing tips come together and kite sometimes Bow-ties.
Answer: Its because the Kite is not FULLY inflated to the correct internal pressure. When the kite is launched hold it so it can inflate further, If it sits at 45° pull on the 2 front lines to get the kite moving - this helps the kite pressurize and to create its true ARC shape.
Venom
Does the Venom have an adjustable leech strap ?
Answer: Yes. The strap tensions the middle 7 cells and is then fixed at every cell to the wing tips.
I have a problem with collapsing tips on my venom ?
Answer: Check your spars are in one piece and the spar pockets are not damaged. Replace the damaged spar, if using
collapsible spars tape the glued end of the connector. Best solution is to replace with single length spars. With the spar fully inserted, grab the spar pocket from either end and then pull towards the
center point. If the pocket bunches up your spars are too short. Contact your dealer or replace with correct length spars. The pocket material is lighter than what was used on earlier ARCs and it will stretch significantly more when pulled.
Tip collapsing on earlier Venom 13m ?
Answer: this only effects a small number of Venom 13m from the first batch of kites produced and sold around March 2005 - this is due to a production error please contact your dealer.
My Venom has ripped open at front spar pocket ?
Answer: This may be the result of a manufacturing fault, in that the internal strap is too long within the 1st cell near the spar. Contact your Dealer.
My Venom keeps turning to the left/right - lines and pigtails have been checked and are all equal lengths ?
Answer: Possible problem with the internal webbing (manufacturing fault) Check the kites outer skin when in flight, if one cell looks flatter compared to others the outer skin is taking all the loading which will result eventually with the outer skin ripping. Measure the cell width with the kite flat to see if the webbing is loose inside your kite. Contact your dealer.
What is the TET mod??
Answer: TET = Trailing Edge Tuck
Instructions
Measure and mark the center of each cell.
Fold & sew the TE seam flat so to shorten each of the 7 central cell by 10% of their width.
Fold and sew the remaining cells (except for the drain hole cells) by 5% of their width.
Do not use cotton to sew the tucks into the kite.
What is the Hyper Venom mod ?
Answer:
It is a modification which includes a TET and an alteration to the internal braid lengths at the wing-tips (B + Shoulder Reconstruction)
BSR mod for Venom
Braids/Straps
#1 = the one closest to the leading edge and is connected at both sides to the front pigtails.
#2 = the next strap away from the leading edge which also is connected to the front pigtails.
#3 = the strap closest to the trailing edge.
TET (##mm each cell) / BSR - 1st / 2nd braid (adjustments for each side of the kite)
V-8 ~ TET= ?? mm / ?? mm / ?? mm
V-10 ~ TET= ?? mm / ?? mm / ?? mm
V-13 ~ TET= 16 mm / 30 mm / 15 mm
V-16 ~ TET= 18 mm / 45 mm / 25 mm
V-19 ~ TET= 22 mm / 50 mm / 30 mm
To adjust the braids #1 & #2 - pull them through the inflation zips at each end of the kite.
#1 braid is fixed at each cell wall so you need to shorten the straps equally in the 3 cells centred on the zipper cell. (30mm adjustment = 10mm in each of the 3 cells)
You access these by pulling the straps through the hole in the cell profile mesh.
#2 Shorten the 2nd braid as per the V2.
#3 This can also be adjusted (shortened) to give the same effect as the steering adjusters on the V2. The braid is sewn at each cell so adjustment should be spread over first 3 cells.
Warning: Under inflation when launching may cause the kite to collapse
Vortex
Does the Vortex have an adjustable leech strap ?
Answer: Yes, the kite also has adjustable wing tip straps. The Internal strap tensions the middle 7 cells and is then fixed at every cell until reaching the #cell where the Steering
adjuster strap starts.
My Vortex doesn't fly well, the wing tips keep collapsing, kite looses it shape and easily bow ties ?
Answer: Remove and check the condition of the spars. Replace if damaged.
Venom II
My VenomII doesn't fly well, the wing tips keep collapsing, kite looses it shape and easily bow ties ?
Answer: Remove and check the condition of the spars. Replace if damaged.
Does the Venom II have an adjustable leech strap ?
Answer: Yes, the kite also has adjustable wing tip straps.
My VenomII keeps turning to the left/right - lines, spars and pigtails have been checked and are all equal lengths ?
Answer: Possible problem with the internal webbing (manufacturing fault). Fly the kite with ALL the adjustable straps set at their minimum effect setting. With the kite in the sky check the kites skin to see that the kite looks balanced or if one cell looks flatter compared to the others and if the skin is taking all the loading (braid is loose) which will result eventually in the skin ripping. With the kite deflated fold the kite in half to first check both sides are equally sized. Next, measure the cell width at each point where the braid is stitched each side of the kite should be identical. With the kite flat - check to see if any of the braiding is loose between each cell when the skin is pulled tight. Contact your dealer if the tests indicate a problem.
Can I add the TET mod ?
Answer: No, its already added. Venom II's have the small triangles
stitched in the Trailing edge of the cells.
What is the BSR mod ?
Answer:
It is an alteration to the internal braid lengths at the wing-tips (B + Shoulder Reconstruction)
The main effect is to increase the kites turning speed, this then should add a little bottom end performance. The TET is not required as it is already added as part of the Venom - VenomII upgrade.
BSR mod for Venom II
Braids/Straps
#1 = the one closest to the leading edge and is connected at both sides to the front pigtails.
#2 = the next strap away from the leading edge which also is connected to the front pigtails.
#3 = the strap closest to the trailing edge.
BSR - 1st /2nd braid (adjustments for each side of the kite)
V2-8 ~ ?? mm / ?? mm
V2-10 ~ ?? mm / ?? mm
V2-13 ~ 30 mm / 15 mm
V2-16 ~ 45 mm / 25 mm
V2-19 ~ 50 mm / 30 mm
To adjust the braids #1 & #2 - pull them through the inflation zips at each end of the kite.
#1 and #2 braids are floating so only require the single adjustment at each zipper cell.
Warning: Under inflation when launching may cause the kite to collapse
What is the LSR mod ?
Answer:
It is an alteration to the BSR mod using just 2nd & 3rd braid adjustments.
LSR mod for Venom II
Braids/Straps
#1 = the one closest to the leading edge and is connected at both sides to the front pigtails.
#2 = the next strap away from the leading edge which also is connected to the front pigtails.
#3 = the strap closest to the trailing edge.
LSR - 1st / 2nd / 3rd braid (adjustments for each side of the kite)
V2-8 ~ -- mm / ?? mm / ?? mm
V2-10 ~ -- mm / ?? mm / ?? mm
V2-13 ~ -- mm / 30 mm / 30 mm & Steering adjusters fully in. shorten the front pigtails by +12cm
V2-16 ~ -- mm / 40 mm / 40 mm & Steering adjusters fully in. shorten the front pigtails by +15cm
V2-19 ~ -- mm / 60 mm / 60 mm & Steering adjusters fully in. shorten the front pigtails by +??cm
For Venom 1:
#1 No adjustment.
#2 Shorten the 2nd braid as per the V2.
#3 The braid is sewn at each cell so adjustment should be spread over first 5 full cells. Including an extra 100mm to allow for the steering adjusted to be pulled fully in.
Kite may also need TET mod to be added for similar performace to the V2
For Venom 2:
#1 No adjustment.
#2 & #3 braid are floating so only require the single adjustment at each zipper cell.
Is it possible to fit the Scopions VPC on a venom I/II ?
Answer: Yes, but its a MAJOR mod, and need loads of work with both sides of the kite being identicaly matched to the nearest millimeter. If you know nothing about kite (foil) building or repair you will destroy your kite trying to fit this mod.
Scorpion
Why does my Scorpion not inflate very well ?
Answer: Check that the Air-Vents are not sealed/trapped by the internal braiding straps nearest to the Leading Edge.
Why does my Scorpion bow-tie when launching ?
Answer: As with the Phantom it's to do with the kites design - the kite requires rear line tension until the kite is fully pressurized. Without the tension on the rear lines, the LE will collapse inwards and the kite will then bowtie.
What is the VPC ?
Answer: VPC is Variable Power Control - its the V shaped bridle which passes through the spar pulleys and is attached to both front and rear pigtails. The bridal works by moving the front tow point back when sheeted in to give more power and then moving it as far forward as
possible to allow for as much depower as possible while still having tight rear lines allowing for fast turning while depowered. Default setting for the V bridle is the middle knot position.
Note: Each side of the V bridle MUST be connected at the same knot position.
What effect does using the different knots have on the kite ?
Answer:
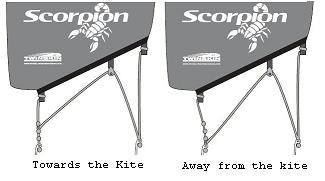
Towards the kite:
* Less direct depower
* Smoother power buildup when sheeting in or out.
* More depower
* Less bar pressure
* Less stalling
Away from the kite:
* More direct depower
* faster power buildup when sheeting in or out.
* More power
* More bar pressure
Will the kite fly with the V bridle removed ?
Answer: Yes, but the kites performance will be reduced.
My Scorpion stalls what is the problem/fix ?
Answer: To stop the kite from stalling you need to add 20cm rear pigtail extensions when using the Zero7 or Zero4 bar set to the default settings. You then adjust the settings to the required rear line length depending on the wind speed you are flying in.
My Scorpion doesnt fully depower on the standard Zero7 bar ?
Answer: To use the Zero7 bar with a Scorpion you need to add 20cm rear pigtail extensions. More noticable on 13m kites.
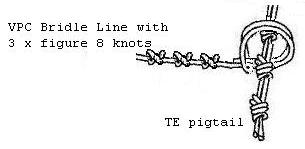
What is the VPC bridle line modification ?
Answer: The modification is to add 3 figure 8 knots to the V-bridle line (line which passes through the pulley) as near to the TE side of the kite as is possible so that they dont prevent the line passing through the pulley.The mod make the kite much more SLE like. You may need to use a bit more depower as the kite powers on much more quickly when sheeted in.
Why has the V bridle line started wearing more quickly than expected ?
Answer: Check that both Pulleys are spinning freely, it could be that one/both have locked up due to a few grains of Sand getting in the pulley.
Why does my Scorpion keep inverting when jumping ?
Answer: When flown in very gusty conditions it is recommended that the internal staps are adjusted tighter than normal (75% of maximum adjustment)
What make are the Pulleys used on the Scorpion ?
Answer: Riley Australia, model # RM 302
NOTE: Correct/updated settings and lengths will be added when I have all the bridle dimensions I require to do the calculations...
Synergy
Charger
Other ARC info...
All the ARC Dimensions
|
|
Area (m) |
Span (m) |
Cord (m) |
Proj. Area
(m) |
AR |
Spar (cm) |
|
 |
S-ARC |
|
|
|
|
|
|
|
| 460 |
4.6 |
4.60 |
1.50 |
3.50 |
4.5 |
82 |
|
| 630 |
6.3 |
5.40 |
1.65 |
4.50 |
4.5 |
95 |
|
| 840 |
8.4 |
6.20 |
1.90 |
6.00 |
4.5 |
110 |
|
| 1120 |
11.2 |
7.20 |
2.20 |
8.00 |
4.5 |
127 |
|
| 1510 |
15.1 |
9.60 |
2.20 |
10.00 |
4.5 |
127 |
|
|
|
|
|
|
|
|
|
|
|
|
Area (m) |
Span (m) |
Cord (m) |
Proj. Area
(m) |
AR |
Spar (cm) |
|
 |
F-ARC |
|
|
|
|
|
|
|
| 1200 |
12.0 |
8.80 |
1.40 |
7.50 |
6.5 |
109 |
|
| 1600 |
16.0 |
10.60 |
1.52 |
9.50 |
7.0 |
120 |
|
|
|
|
|
|
|
|
|
|
|
Area (m) |
Span (m) |
Cord (m) |
Proj. Area
(m) |
AR |
Spar (cm) |
|
|
|
|
|
|
|
|
|
|
 |
Guerilla |
|
|
|
|
|
|
|
| 10 |
10.0 |
7.44 |
1.60 |
6.50 |
4.25 |
107 |
|
| 13 |
13.0 |
9.18 |
1.81 |
8.50 |
4.5 |
127 |
|
| 15 |
15.0 |
9.90 |
1.95 |
10.00 |
4.5 |
145 |
|
| 18 |
18.0 |
10.64 |
2.10 |
12.00 |
4.5 |
150 |
|
|
|
|
|
|
|
|
|
|
|
|
Area (m) |
Span (m) |
Cord (m) |
Proj. Area
(m) |
AR |
Spar (cm) |
|
 |
Bomba |
|
|
|
|
|
|
|
| 8.5 |
8.5 |
6.12 |
1.55 |
5.30 |
3.5 |
83 |
|
| 10.5 |
10.5 |
6.70 |
1.67 |
6.60 |
3.5 |
91 |
|
| 13 |
13.0 |
8.00 |
1.90 |
8.10 |
3.5 |
102 |
|
| 15 |
15.0 |
8.30 |
2.00 |
9.30 |
3.5 |
111 |
|
| 17 |
17.0 |
8.90 |
2.32 |
10.60 |
3.5 |
116 |
|
| 20 |
20.0 |
9.80 |
2.53 |
12.50 |
3.5 |
127 |
|
|
|
|
|
|
|
|
|
|
|
|
Area (m) |
Span (m) |
Cord (m) |
Proj. Area
(m) |
AR |
Spar (cm) |
|
 |
Guerilla II |
|
|
|
|
|
|
|
| 9 |
9.0 |
6.81 |
1.44 |
5.60 |
5.0 |
73 |
|
| 11 |
11.0 |
7.94 |
1.60 |
6.90 |
5.0 |
82 |
|
| 13 |
13.0 |
8.40 |
1.75 |
8.10 |
5.0 |
90 |
|
| 15 |
15.0 |
8.80 |
1.92 |
9.40 |
5.0 |
97 |
|
| 18 |
18.0 |
10.20 |
2.13 |
11.30 |
5.0 |
120 |
|
| 22 |
22.0 |
10.50 |
2.17 |
13.80 |
5.0 |
127 |
|
|
|
|
|
|
|
|
|
|
|
|
Area (m) |
Span (m) |
Cord (m) |
Proj. Area
(m) |
AR |
Spar (cm) |
|
 |
Phantom |
|
|
|
|
|
|
|
| 6 |
6.0 |
6.20 |
1.00 |
3.80 |
6.5 |
81 |
|
| 9 |
9.0 |
7.60 |
1.35 |
5.70 |
6.5 |
99 |
|
| 12 |
12.0 |
8.80 |
1.50 |
7.60 |
6.5 |
116 |
|
| 15 |
15.0 |
9.90 |
1.70 |
9.50 |
6.5 |
129 |
|
| 18 |
18.0 |
10.80 |
1.85 |
11.50 |
6.5 |
140 |
|
|
|
|
|
|
|
|
|
|
|
Area (m) |
Span (m) |
Cord (m) |
Proj. Area
(m) |
AR |
Spar (cm) |
|
 |
Venom |
|
|
|
|
|
|
|
| 8 |
8.0 |
6.32 |
1.37 |
5.60 |
5.0 |
85 |
|
| 10 |
10.0 |
7.07 |
1.53 |
7.00 |
5.0 |
93 |
|
| 13 |
13.0 |
8.06 |
1.74 |
9.10 |
5.0 |
105 |
|
| 16 |
16.0 |
8.94 |
1.93 |
11.30 |
5.0 |
120 |
|
| 19 |
19.0 |
10.00 |
2.16 |
13.70 |
5.0 |
132 |
|
|
|
|
|
|
|
|
|
|
|
|
Area (m) |
Span (m) |
Cord (m) |
Proj. Area
(m) |
AR |
Spar (cm) |
|
 |
Vortex |
|
|
|
|
|
|
|
| 8 |
8.0 |
6.00 |
1.45 |
5.50 |
4.0 |
92 |
|
| 10 |
10.0 |
6.71 |
1.62 |
6.90 |
4.0 |
103 |
|
| 12 |
12.0 |
7.35 |
1.78 |
8.30 |
4.0 |
114 |
|
| 14 |
14.0 |
7.94 |
1.92 |
9.70 |
4.0 |
123 |
|
| 17 |
17.0 |
8.75 |
2.12 |
11.70 |
4.0 |
135 |
|
|
|
|
|
|
|
|
|
|
|
|
Area (m) |
Span (m) |
Cord (m) |
Proj. Area
(m) |
AR |
Spar (cm) |
|
 |
Venom II |
|
|
|
|
|
|
|
| 8 |
8.0 |
6.32 |
1.35 |
5.60 |
5.0 |
87 |
|
| 10 |
10.0 |
7.07 |
1.50 |
7.00 |
5.0 |
97 |
|
| 13 |
13.0 |
8.06 |
1.70 |
9.10 |
5.0 |
109.5 |
|
| 16 |
16.0 |
8.94 |
1.88 |
11.30 |
5.0 |
122.5 |
|
| 19 |
19.0 |
10.00 |
2.09 |
13.70 |
5.0 |
137 |
|
|
|
|
|
|
|
|
|
|
|
|
Area (m) |
Span (m) |
Cord (m) |
Proj. Area
(m) |
AR |
Spar (cm) |
|
 |
Scorpion |
|
|
|
|
|
|
|
| 7 |
7.0 |
5.92 |
1.19 |
4.7 |
5.5 |
93 |
|
| 10 |
10.0 |
7.05 |
1.42 |
6.8 |
5.5 |
119 |
|
| 13 |
13.0 |
8.03 |
1.62 |
8.9 |
5.5 |
127 |
|
| 16 |
16.0 |
8.90 |
1.80 |
10.9 |
5.5 |
142 |
|
|
|
Area (m) |
Span (m) |
Cord (m) |
Proj. Area
(m) |
AR |
Spar (cm) |
|
 |
Synergy |
|
|
|
|
|
|
|
| 6 |
6.5 |
5.40 |
1.38 |
3.80 |
4.5 |
88 |
|
| 8 |
8.1 |
6.10 |
1.53 |
4.80 |
4.6 |
97 |
|
| 10 |
10.2 |
6.92 |
1.68 |
6.00 |
4.7 |
107.5 |
|
| 12 |
12.6 |
7.78 |
1.85 |
7.40 |
4.8 |
119 |
|
| 15 |
15.7 |
8.77 |
2.04 |
9.20 |
4.9 |
129.5 |
|
| 19 |
19.7 |
9.93 |
2.26 |
11.60 |
5.0 |
143.5 |
|
| 24 |
24.0 |
11.13 |
2.49 |
14.20 |
5.1 |
160 |
|
|
|
Area (m) |
Span (m) |
Cord (m) |
Proj. Area(m) |
AR |
Spar (cm) |
|
 |
Charger |
|
|
|
|
|
|
|
| 6 |
? |
? |
? |
? |
? |
? |
|
| 8 |
8.0 |
6.26 |
1.57 |
5.0 |
4.9 |
105.5 |
|
| 10 |
10.1 |
7.03 |
1.75 |
6.3 |
4.9 |
116.5 |
|
| 12 |
12.4 |
7.79 |
1.92 |
7.6 |
4.9 |
126 |
|
| 15 |
15.5 |
8.72 |
2.14 |
9.5 |
4.9 |
139 |
|
| 19 |
19.4 |
9.75 |
2.34 |
11.9 |
4.9 |
156 |
|
|
|
|
|
|
|
|
|
|
|
|
Area (m) |
Span (m) |
Cord (m) |
Proj. Area
(m) |
AR |
Spar (cm) |
|
Copyright:
NOT TO BE COPIED or STORED ON ANY OTHER WEBSITE WITHOUT PERMISSION FROM THE AUTHOR.